eCaseView / E‑Certify / Log In User Guide
Introduction
eCaseView
The Clerk of the Circuit Court & Comptroller’s eCaseView application is a user-friendly, web-based search tool that gives you instant and easy access to criminal and civil case records with the option to purchase certified court records.
eCaseView is compatible with most browsers that are used on Microsoft Windows and Mac OS computers, as well as tablets and smartphones. The content that is displayed will automatically adjust to the appropriate screen size through the use of HTML 5. eCaseView works best in the latest versions of Edge (recommended). The latest version of Adobe Reader is recommended for viewing document images. For the best viewing experience, maximize your browser window.
With eCaseView, all users – attorneys and members of the general public – can access redacted criminal and civil case records and see case document images (per Fla. Supreme Court Administrative Orders “STANDARDS FOR ACCESS TO ELECTRONIC COURT DOCUMENTS AND ACCESS SECURITY MATRIX”).
NOTE: Only the attorney(s) of record can see a defendant’s driving record and driver license number. Furthermore, to protect sensitive and confidential information, certain documents will be viewable only upon request.
E‑Certify
The Clerk of the Circuit Court & Comptroller, Palm Beach County, offers redacted Electronic Certified Court Documents for purchase on the Clerk's website. Clerk e-Certify is software used by the Clerk of the Circuit Court & Comptroller to generate tamper-proof and self-validating certified copies of Court Records. Clerk e-Certify is accessible from any computer and on any web-enabled smartphone or tablet. Each electronic certified document uses advanced encrypted features to produce a tamper-proof electronic certified document that will include a unique Clerk of Court digital signature. With Clerk e-Certify:
- Users can order and immediately receive certified copies of redacted court records through a secure web portal.
- Recipients at government agencies, public institutions, banks, and other entities can easily authenticate the electronic certificates and confirm that the documents were not altered.
- Parties who receive the eCertified documents from a customer can authenticate them anytime from anywhere using a clickable link on the document's cover page or scanning the QR code on the cover page with their smartphone to authenticate the document online.
Some records have statutory or court-ordered viewing restrictions and might not be viewable online. The purpose of this document is to provide guidelines for purchasing easy-to-obtain, tamper-proof court documents. Guidelines are also provided on authentication of the certified documents.
Electronic certification is new technology and the Clerk’s office is partnering with government agencies and other institutions to educate them on the technology and its benefits, including but not limited to security. Always verify that the agency you are procuring the document for accepts eCertified documents. In the event that the establishment does not accept these documents, you will be required to purchase your certified document(s) in person at our Records Services Department in Room 4.2500 or any one of our branch locations.
NOTE: If you have already procured an electronic copy that was not accepted by an institution, the Clerk’s office will provide a manually stamped certified document free of charge.
Log In
eCaseView is available anonymously as a guest user or you can sign up as a registered user for increased access to information. You can sign up as a registered user by submitting a User Registration Form (PDF) to the Clerk of the Circuit Court and Comptroller.
Registered users will log in with their registered email address and a password. You will also be asked to set up multi-factor authentication via email or the Microsoft Authenticator app on your phone or device. When selecting MFA email, only the registered email should be used. When selecting Microsoft Authenticator, only one device may be enrolled for an eCaseView user.
Frequently Asked Questions
The Clerk of the Circuit Court and Comptroller web site has answers to many Frequently Asked Questions about eCaseView. If you have a question or need help, please look here and contact us if you still need help.
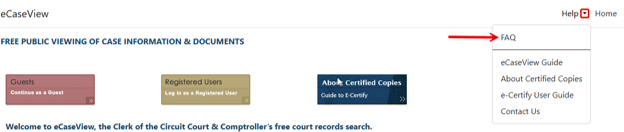
Questions? Need Help?
If you are having access issues, please contact the Clerk of the Circuit Court & Comptroller’s office at: eCaseView-Support@mypalmbeachclerk.com
Getting Started
Accessing Court Records Online
- Open the https://appsgp.mypalmbeachclerk.com/eCaseView/ website in your browser or device.
- Click Guests or Registered Users to continue.

Guest users are able to perform searches for court records, view case documents and purchase court records, but the user is provided with fewer search fields.
For security purposes, all eCaseView pages displaying the reCAPTCHA flag go through verification. This security measure applies to all eCaseView users.

NOTE: eCaseView supports modern versions of browsers such as Chrome, Firefox, Safari and Microsoft Edge (recommended). This website is not compatible with any version of Internet Explorer or compatibility mode. If you are having problems, be sure you are using a modern web browser such as Chrome, Firefox, Safari or Microsoft Edge or newer (without compatibility mode).
Log In (Registered Users and Attorneys)
Registered Users and Attorneys must enter their Registered Email Address and Password and click the Login button.
To protect specific high security case information, any registered user is required to complete multi-factor authentication.
For security purposes, all eCaseView pages displaying the reCAPTCHA flag go through verification. This security measure applies to all eCaseView users.
NOTE: The search fields below are available only to Registered Users (not to Guest users):
- Date of Birth
- Driver License
- Incident Number
- Arrest Date
- Booking Number
- Bar Number

- Enter your email address in the Email Address input box. This is the email you used to sign up on the User Registration Form (PDF) .
-
Enter your password.
- If you forgot your password, you can click the “Reset Password” link and follow the instructions below.
- Click the “Sign In” button.
Reset your Password
If you need to reset your password, you can click the Reset Password link on the login window. You will need to have access to your Registered Email Address (the one from your sign-up form).

- Enter your Registered Email Address in the Email box.
- Click Send Verification Code.

- Enter the Verification code from your email into the Verification Code box and click Verify Code.
- You can now enter a new password.
Multi-Factor Authentication
Multi-Factor Authentication is a security feature to better protect your account from hacking. Multiple “factors” include “something you know” (e.g. password) as well as “something you have” (email account).
Once you log in with your Registered Email Address and your password, you will be asked to verify your login with “something you have.”
Select:
- Email (an email will be sent to your Registered Email Address)
- Microsoft Authenticator App (on your device)

Multi-factor Authentication (Email)
If you select email, you will see the following screen:

- Enter your Registered Email Address.
- Click Send verification code.

- Open your Registered Email Address account on your device.
- Enter the code from the email into the Secondary Verification Code.
- Click Verify Code.
Multi-factor Authentication (Microsoft Authenticator App)

- Open Microsoft Authenticator on your device.
- Click Verify.
Setting up Microsoft Authenticator App
Microsoft Authenticator can be a convenient way to get a multi-factor code from your phone or device. (Google or other authenticators are not supported at this time).
Please note that by design, only one device may be enrolled for an eCaseView user.
Before you get codes from the Microsoft Authenticator app, there are a few steps to set it up on your phone or device.
- Open your device’s App Store (e.g. Google Play or Apple Store).
- Search for Microsoft Authenticator.
- Download and install the Microsoft Authenticator app.
- Once the app is installed, open the Microsoft Authenticator app.
- Navigate to the eCaseView website.
- Log in as a registered user.
- Select the Microsoft Authenticator option.
- On the User Details screen, you will see the QR code.
- Open the Microsoft Authenticator app on your device.
- Scan the QR code on the eCaseView login screens using the viewer in the Authenticator App.
- Click Continue.

Once you are done scanning the QR code, you should see the “PB Clerk External Users” code for eCaseView login.
Search and Documents
Search Criteria
To begin a search, enter information in one or more fields to make your search results as broad or as narrow as desired.
- Enter search criteria
- Click Search

A specific case can be found by using only the Case Number, Citation Number, Incident Number or Booking Number.
Searches can be further narrowed by entering a date range using the Offense Begin Date and Offense End Date fields in combination with a defendant’s name, DOB*, etc. Enter dates in the format MM/DD/YYYY.
- Additionally, eCaseView provides Registered Users with the ability to perform searches using a Driver’s License Number or Florida Bar Number as search criteria.
- Florida driver’s licenses issued after 11/1/2023 have a new numbering sequence. For a complete list of Palm Beach County cases, search by name.
- If the search results contain more than 200 records, additional search criteria may be included along with the Florida Bar Number.
For example: The Registered User may perform a search with Bar Number and Court Type, or a Bar Number and File Date Range, or a Bar Number and Last Name / Company Name. A hyperlink with further details regarding Florida Bar search options is available on the Search Criteria page.
NOTE: If a case is not available immediately following arrest or issuance of a citation, check again within 3 business days (taking into account non-business hours, weekends and holidays).
I know the case number
- A case number must be entered using the format shown in the example: the 4-digit year followed by the 2-letter court-type designation, and all 6 digits of the case number including any zeros.
- For Traffic and Criminal cases, including the co-defendant letter designation at the end of the case number will return a specific co-defendant’s case; leaving it off will return all defendants with the same case number.
- By default, the search results will display as only one row per case. To display the search results as individual entries according to each party assigned to the case, uncheck the One Row Per Case checkbox.
- For Civil and Juvenile cases filed on or before August 31, 2023, the UCN number will contain XXXX letter designation at the end. (I.E., 502022DR000100XXXXSB, 502022CA000100XXXXMB)
- For Civil and Juvenile cases filed on or after September 1, 2023, the UCN number will contain XXXA letter designation at the end. (I.E., 502023DR000200XXXAWB, 502023CA000200XXXANB)
I only know the defendant or company name
Enter the defendant’s last name. Entering the defendant’s first name or first initial and/or date of birth will narrow your search results, especially for common names.
When searching for a Company use the Last Name/Company Name box.

Managing the Search Results Screen
The search results will be displayed after search criteria is entered. NOTE: A maximum of 200 results will be returned.
Click on a case number to show information for that specific case, including documents.

- The results will default to 25 records per page. Select the Page Size drop-down menu to alter the number of rows that will display per page.
- Any case that is highlighted yellow within the search results has an open warrant. NOTE: Once the case is opened, the case number and case style remain highlighted in yellow.
- Page buttons are rectangular or circular depending on the Internet browser used.
- All column headings can be sorted in either ascending or descending order. NOTE: Column headings on all tabs have the same sort & toggle functionality.
- To open a specific case, double click the case number hyperlink under the Case Number column. The case record opens to the Case Info screen.
- A complete printout of search results can be downloaded to a csv file and opened using Excel by selecting the Page Size to All and clicking the CSV (Comma separated values) button at the bottom of the page.

Explanation of Case Record Tabs

- Case Info – Basic defendant & case information, including offense date and case status.
- Party Names – Name & info on all party types associated with the case (defendant, attorneys, witnesses, etc.). NOTE: Only an attorney-of-record who is a Registered User will see a client’s Driver’s license number instead of asterisks under the License column heading.
- Dockets & Documents – Docket entries are sortable by the column heading.
- Case Fees – Payment due dates, balances, payment plans and receipt records.
- Charges / Sentences – Charges filed and sentencing information.
- Court Events – Listing of all previous and future court dates.
- Warrants / Service Docs – Warrant information.
- Arrests / Bonds – History of arrest details and bond information, including current status.
Dockets & Documents Tab

- Redacted documents can be viewed and purchased from this tab. Recorded items display a book and page number in the docket entry; however, the image will not display the recorded document or recording stamp.
- If you need to order a certified copy of a recorded document, visit Official Records Research by clicking here copies and records research.
- NOTE: Only an attorney-of-record who is a Registered User is able to view a client’s driver record.
- The docket entry results will default to 25 per page. The results may be expanded further by using the Page Size drop-down menu.
Warrants & Service Docs

Expanding the Document Id will display details about the warrant including the docket number for viewing the image under the Dockets & Documents tab.
NOTE: A direct file warrant will not be listed or viewable until one (1) year after it has been issued.
Viewing Case Documents and View on Request (VOR)
With eCaseView all users can see case redacted document images (per Fla. Supreme Court Administrative Orders “STANDARDS FOR ACCESS TO ELECTRONIC COURT DOCUMENTS AND ACCESS SECURITY MATRIX”).
NOTE: If using a private, non-courthouse computer, only the attorney(s) of record who are Registered Users can view document images for Guardianship, Probate and Family case types.

On the Dockets & Documents tab, click the document icon in the far-left column. A PDF image of the document will open.
To protect sensitive and confidential information contained in case records, certain documents will only be viewable on request (VOR). Depending on the case type, different images are available only upon request. Some case types have greater potential for confidential or sensitive data. Currently, those documents include:
| Florida Chapter | Florida Statute | Statute Description |
|---|---|---|
| 381 | 381.004 | HIV TESTING |
| 394 | ENTIRE CHAPTER – MENTAL HEALTH (ICCSVP – RYCE ACTS) | |
| 741 | ENTIRE CHAPTER – DOMESTIC VIOLENCE | |
| 784 | 784.046; .047; .048; .049; .085 | ASSAULT, BATTERY, STALKING |
| 787 | ENTIRE CHAPTER – KIDNAPPING, FALSE IMPRISONMENT, LURING/ENTICING A CHILD | |
| 794 | ENTIRE CHAPTER - SEXUAL BATTERY | |
| 796 | ENTIRE CHAPTER – PROSTITUTION | |
| 800 | ENTIRE CHAPTER – LEWD, INDECENT EXPOSURE | |
| 810 | 810.14 | VOYEURISM |
| 827 | ENTIRE CHAPTER – CHILD ABUSE, AGG. CHILD ABUSE | |
| 847 | ENTIRE CHAPTER – SEXUAL PERFORMANCE BY A CHILD |
Documents only available as VOR are represented on eCaseView by a lock icon which stands for “View on Request.” Clerk staff will review the document to confirm accurate redaction of all sensitive and confidential information. The lock icon changes to the “In Process” clock icon while the redaction review is taking place. Once the document is approved, the hyperlink will change to the document icon and all subsequent users will be able to view the document. A shopping cart icon means a certified copy of the viewable document may be added to the cart. Click the shopping cart icon to order a certified document.

To request to view a VOR document

- On the Dockets & Documents tab, click the golden lock icon. The Document Confirmation window opens:
- Select “Submit Request.” An email address may be entered in the field provided but is not required. However, if you do not enter an email address then you must check back later to see if the document is available for viewing. The lock icon changes to the “In Process” clock icon while the redaction review is taking place. NOTE: You may also select the clock icon to request email notification while a document is being reviewed for redactions. When the document is made viewable, all users that submitted a request will receive an email notification at that time.
-
Generally, documents will be reviewed and approved for viewing within 3 business days taking into account:
- The size of the document.
- The amount of potentially sensitive/confidential information contained within the document.
- The current review workload.
- Select the Return to Case button. This button will bring you back to the Dockets & Documents tab.
Reminder: Once the document is approved, the “In Process” clock icon will change to the document icon and the image will be viewable by all subsequent users.
e‑Certify
Ordering a Certified Copy of a Document
- Navigate to the available docket entry with image on the Dockets & Document Tab. NOTE: Docket entries without an icon have no images available.
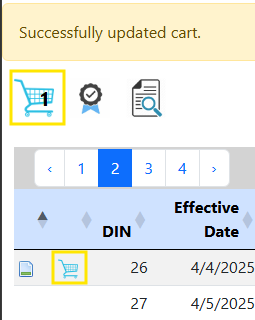
- Click on the shopping cart icon to order a certified image of that document. NOTE: Users may add more than one document to their cart for purchase.
-
When completed, click the shopping cart icon to review all the documents and Proceed to Checkout.
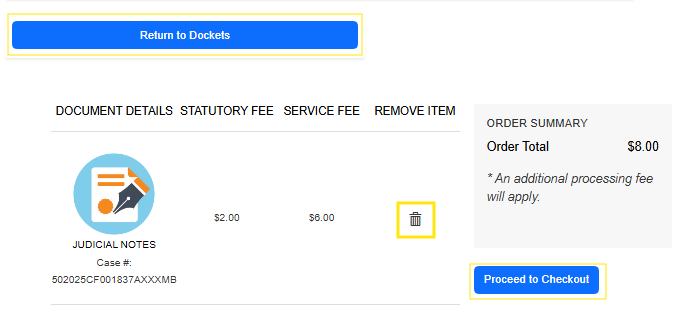
- The following screen will populate. NOTE: Electronic certified copies are $8 per document, which includes a $2 statutory fee plus a $6 service fee. A 3.5% payment processing fee will apply to transactions paid by credit or debit cards, Google Pay, and Apple Pay. Proceed to Checkout.
-
To remove a document from the cart, click the recycle bin
 icon in the right‑most column of the cart list.
- To go back to the dockets list, click the Return to Dockets button.
-
To check out and complete payment, click on the Proceed to Checkout button.
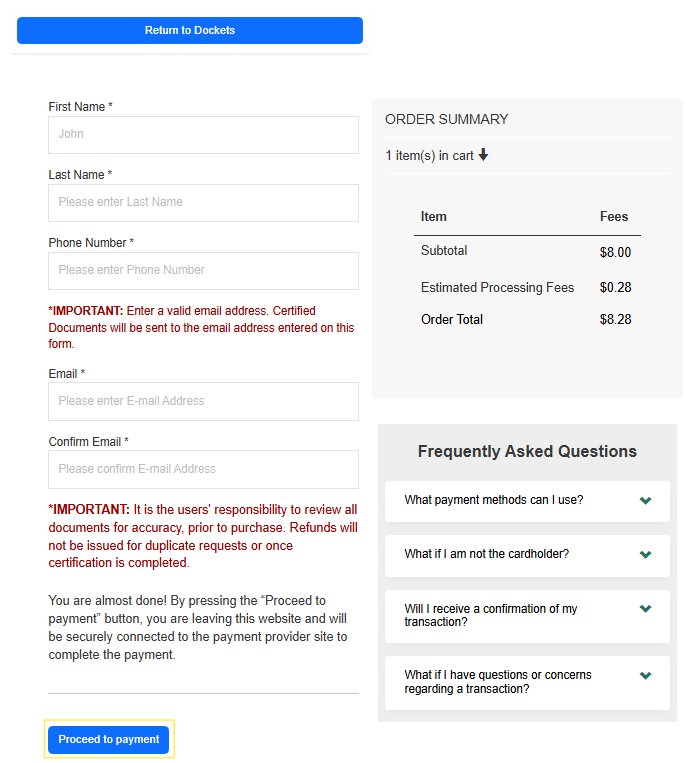
- The summary of the transaction screen will display. Enter the required information. Click Proceed to Payment to continue.
NOTE: User must enter a valid email address. Certified Documents will be sent to the email address entered on this form. It is the user’s responsibility to review all documents for accuracy, prior to purchase. Refunds will not be issued for duplicate requests or once certification is completed.
NOTE: Recorded items display a book and page number in the docket entry; however, the image will not display the recorded document or recording stamp. If you need to order a certified copy of a recorded document, visit copies and records research.
e‑Certify Payment
-
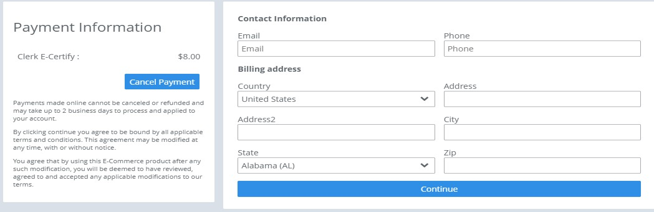
Enter the required Payment Information and click Continue.
NOTE: Users may cancel payment by selecting the Cancel Payment button.
-
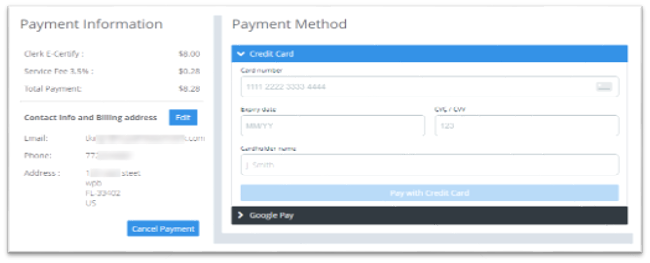
The Payment Method window displays. Select the applicable Payment Method to complete the transaction.
Users may pay using the following methods:
- Credit Card
- Debit Card
- Google Pay
- Apple Pay (This option will only display on a supported device.)
-
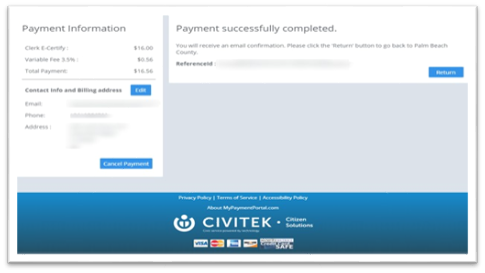
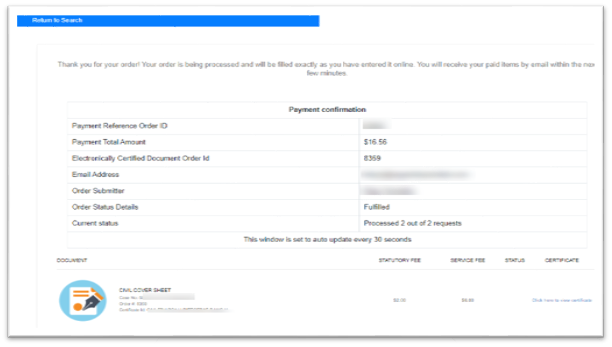
The payment confirmation window will display once the payment successfully completes.
(The Payment Information will update based on payment selection made.)
-
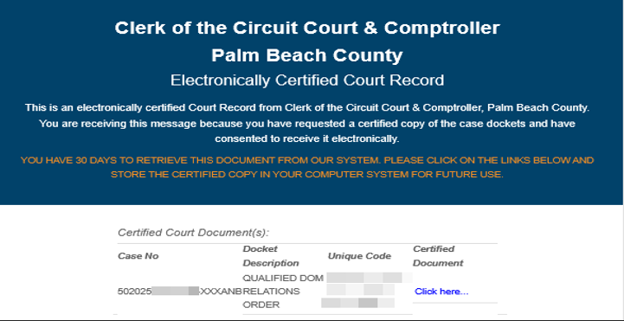
Users will receive two emails, one with the transaction receipt and one with the documents ordered.
A customer has 30 days from the date of payment to retrieve the document sent via email.
A customer can save the certified copy on their personal computer for future use.
Certified Documents
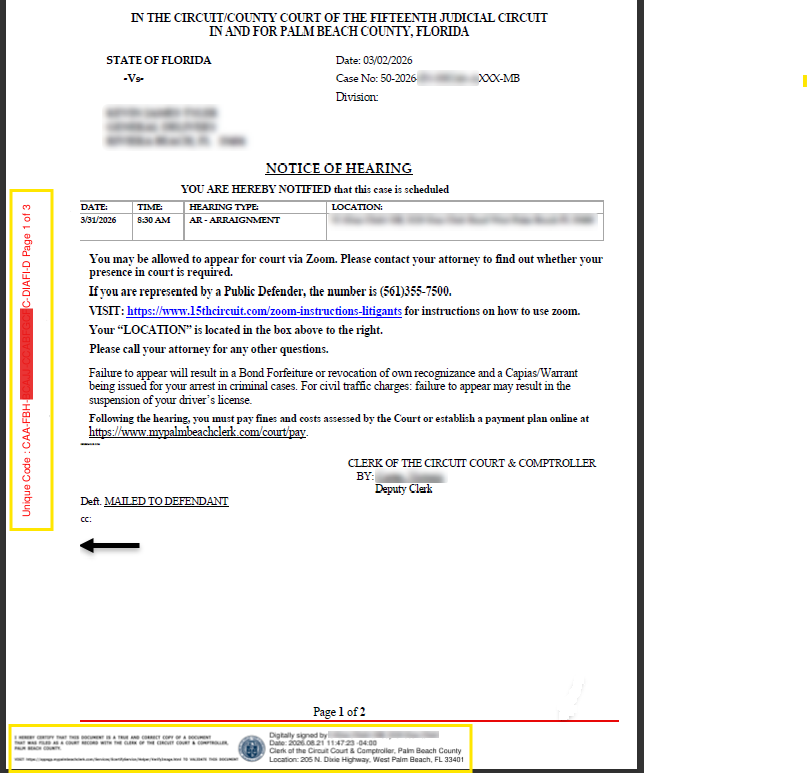
A certified copy of a court record will include a cover page with document information. The cover page includes steps to verify the certified document using the generated QR code and linked website.
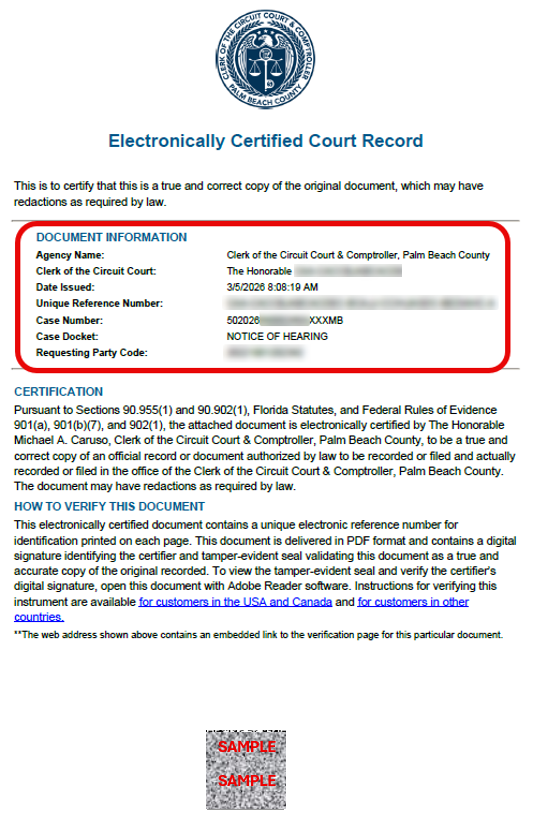
Once a document is electronically certified, it will now yield a banner with a unique code as well as an electronic stamp and seal at the bottom of the document.